Today I will guide you How to Setup Custom free Domain to Blogger. Adding a custom domain to your blog brings more professionality and increase your rankings in search engines.
Adding a custom domain to your blogger blog will change your blog address from yourblog.blogspot.com to yourblog.com, yourblog.tk, yourblog.net or whatever domain extension you registered. So let's get started on how you can register free .tk, .ga, .gq, .cf, .ml domains for your blog and use it as a custom domain name in blogger. This will surely build trust toward your visitors and increase your visitors count too as people prefer to visit a custom domain blog instead of a sub-domain. So let's start the tutorial on using freenom free domain names as Blogspot blog's custom domain.
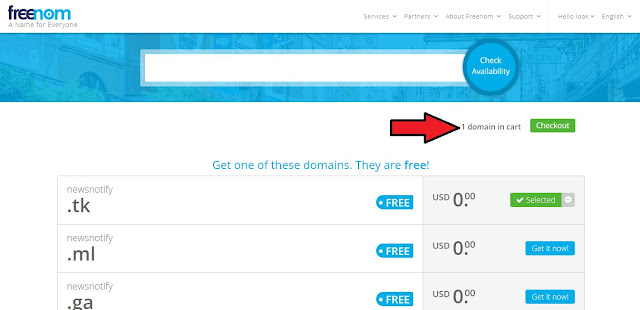
Step 1: Go to Freenom.com and check availability by entering a great domain name for your blog.
Step 2: If it is available, click on Get it now! button and the selected domain will be added to your cart.
Step 3: After that, click on the checkout tab.
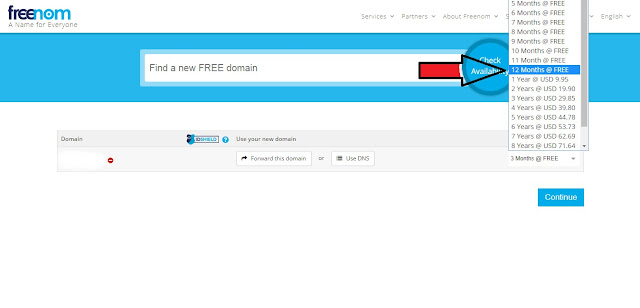
Step 4: On the next page, change the Period from 3 months to 12 months ( Don't worry, it remains free) and Click Continue.
Step 5: Now enter your email address in the given space or you can use your social profile for login. If you want to sign up using an email address then enter it and click on Verify my Email.
Step 6: Check! You will receive a confirmation link to your email address. Simply, click on that.
Step 7: Congrats! You have registered your free domain.
Now It's time to set up to use it as a custom domain. For doing so, follow the steps.
Step 2: Under Publishing, you will see a button like this: "+Set up a third-party URL for your blog", Click on that.
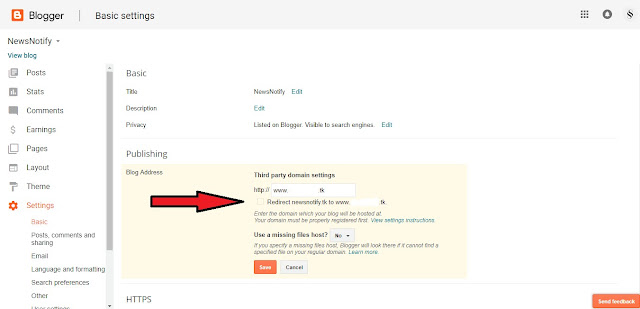
Step 3: Enter the domain name you just registered through Freenom. (along with www) and click Save.
Step 4: It will show an error, Don’t worry it means that your freenom domain does not yet point to any DNS record.
Step 5: So, Go to your freenom account. On Menu bar “Domains” click on sub-menu “My Domains”
Step 6: Click on Manage Domains and then Manage Freenom DNS.
Step 7: Enter the CNAME records as shown by Blogger when you enter your domain name. (As Shawn in Step 3)
Step 8: Also, add these 4 A records. (Leave Name Empty and enter these values one by one in Target Area.
Click on Save Changes.
Step 9: Now, move to the Blogger account and click on the Save button again.
Step 10: It will not show any error now and will get saved.
Sometimes, It may take up to a few minutes to update the DNS records, so keep patience if it still shows error and tries saving it after 5-10 minutes.
Step 11: Once it gets saved, Click on Edit and tick the redirect box and press Save again.
Well done! You have successfully set up a free custom domain name for your Blogspot blog. Freenom domains can be used on any website. Do share this post with your friends and if you have any queries or doubts regarding this article then drop a comment in the comment section below, I will soon get back to you with a new article till then stay tuned.
Tags: how to connect freenom domain with blogger,how to,how to link blogger to .tk domain,how to add freenom domain to blogger,how to add .tk domain to blogger,how to add dot tk domain to blogger,how to setup custom domain on blogger,how to connect custom domain with blogger,add freenom domain on blogger website,how to set up a custom domain in blogger,domain to blogger
Adding a custom domain to your blogger blog will change your blog address from yourblog.blogspot.com to yourblog.com, yourblog.tk, yourblog.net or whatever domain extension you registered. So let's get started on how you can register free .tk, .ga, .gq, .cf, .ml domains for your blog and use it as a custom domain name in blogger. This will surely build trust toward your visitors and increase your visitors count too as people prefer to visit a custom domain blog instead of a sub-domain. So let's start the tutorial on using freenom free domain names as Blogspot blog's custom domain.
How to Register Free Freenom Domain :
Just follow the below steps to register your .tk, .ml, .cf, .ga, .gq domain name for 1 year absolutely free of cost. After the completion, we will discuss how to use it as a custom domain on Blogger.Step 1: Go to Freenom.com and check availability by entering a great domain name for your blog.
Step 2: If it is available, click on Get it now! button and the selected domain will be added to your cart.
Step 3: After that, click on the checkout tab.
Step 4: On the next page, change the Period from 3 months to 12 months ( Don't worry, it remains free) and Click Continue.
Step 5: Now enter your email address in the given space or you can use your social profile for login. If you want to sign up using an email address then enter it and click on Verify my Email.
Step 6: Check! You will receive a confirmation link to your email address. Simply, click on that.
Step 7: Congrats! You have registered your free domain.
Now It's time to set up to use it as a custom domain. For doing so, follow the steps.
How to Set Freenom Custom Domain With Blogger?
Step 1: Go to your Blogger blog's Dashboard and click on the Settings tab.Step 2: Under Publishing, you will see a button like this: "+Set up a third-party URL for your blog", Click on that.
Step 3: Enter the domain name you just registered through Freenom. (along with www) and click Save.
Step 4: It will show an error, Don’t worry it means that your freenom domain does not yet point to any DNS record.
Step 5: So, Go to your freenom account. On Menu bar “Domains” click on sub-menu “My Domains”
Step 6: Click on Manage Domains and then Manage Freenom DNS.
Step 7: Enter the CNAME records as shown by Blogger when you enter your domain name. (As Shawn in Step 3)
Step 8: Also, add these 4 A records. (Leave Name Empty and enter these values one by one in Target Area.
A Name Records:
- 216.239.32.21
- 216.239.34.21
- 216.239.36.21
- 216.239.38.21
Click on Save Changes.
Step 9: Now, move to the Blogger account and click on the Save button again.
Step 10: It will not show any error now and will get saved.
Sometimes, It may take up to a few minutes to update the DNS records, so keep patience if it still shows error and tries saving it after 5-10 minutes.
Step 11: Once it gets saved, Click on Edit and tick the redirect box and press Save again.
Well done! You have successfully set up a free custom domain name for your Blogspot blog. Freenom domains can be used on any website. Do share this post with your friends and if you have any queries or doubts regarding this article then drop a comment in the comment section below, I will soon get back to you with a new article till then stay tuned.
Tags: how to connect freenom domain with blogger,how to,how to link blogger to .tk domain,how to add freenom domain to blogger,how to add .tk domain to blogger,how to add dot tk domain to blogger,how to setup custom domain on blogger,how to connect custom domain with blogger,add freenom domain on blogger website,how to set up a custom domain in blogger,domain to blogger


Tnx
ReplyDeleteMy pleasure bro
Deletethanks
ReplyDeleteNo problem bro
Deletehey hi i am following your blog from 1 week, and you are doing great. why you don't take adscence approval for your blog
ReplyDeleteSee the thing is my blog is already adsense approved but i am not showing ads here.
Deleteyour adsense is not approverd
ReplyDeleteis adsense approved in .blogspot.com as your website is
This blog is adsense approved bro
DeleteThanks,
ReplyDeleteI have followed these steps and
Got domain name . But when I used to add this to my blogger account it shows couldn't updated setting.
Post a Comment