Tracking statistics of the blog is one of the secrets of successful blogs which is probably taken for granted. Every blogger wants to know about the audience visiting his/her blog i.e. about the time they spend on our blog, about their locations, their landing pages and so on.
Blogger Stats Tab provides good information but not to the fullest. Google Analytics is the best and free option to know our audience in just a few clicks. It let us know almost each and everything a blogger wants to know about his/her audience.
Google Analytics will tell you to minute to minute and second to second data of for what duration a visitor stayed on your website and then bounced back. The bouncing data can be tracked from Bounce Rate details provided separately and overall for each and every page. To install Google Analytics onto your Blogger you must follow the below instructions as given. Being a blogger if you aren't using Analytics then you are missing something which is valuable. So today we will learn how we can add Google Analytics to our blogger blog.
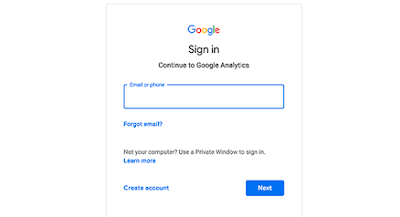
Step 2. After signing-in to your Google Account you will be seen a page like the below image, simply click on Sign Up.
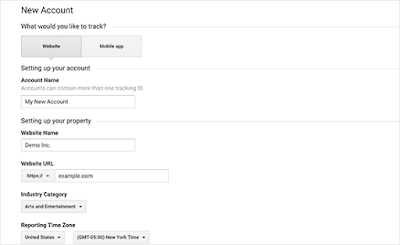
Step 3. Now in this step, you have to enter your personal details like Website name, Website URL, Time zone and so on.
Step 4. Fill the details and when done, hit the "Get Tracking ID" button and proceed to the next step.
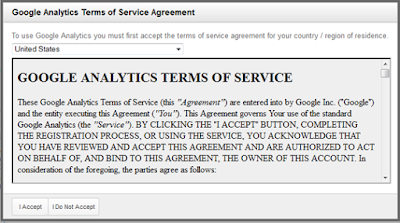
Step 5. On pressing the "Get Tracking ID" button, a new window will prompt, Which would consist of Google Analytics terms of service agreement. Carefully read it and press the "I Agree" button, and move to the next step.
Step 6. After agreeing to the agreement, the page will redirect you to a new page that would help in tracking your website.
On the top, there will be a "Tracking ID" and on the bottom, there would be a "Tracking JavaScript Code". Copy the Tracking ID which looks like UA-xxxxx-Y and head on to the next steps mentioned below.
You'are all done!
I hope you successfully added Google Analytics to your blogger blog. Now you're all set to keep an eye on each and every visitor of your blog. If you liked this article then do share this with your friends and if you have any queries or doubts then drop a comment in the comments section below, I will get back you with the new article very soon till then stay tuned.
Tags: how to add google analytics to blogger,google analytics,blogger,how to setup google analytics,how to use google analytics,google analytics tutorial,how to set up google analytics on blogger,how to setup google analytics account,how to use google analytics with blogger,add google analytics to blogger,google analytics (software),how to set up google analytics,how to
Blogger Stats Tab provides good information but not to the fullest. Google Analytics is the best and free option to know our audience in just a few clicks. It let us know almost each and everything a blogger wants to know about his/her audience.
Google Analytics will tell you to minute to minute and second to second data of for what duration a visitor stayed on your website and then bounced back. The bouncing data can be tracked from Bounce Rate details provided separately and overall for each and every page. To install Google Analytics onto your Blogger you must follow the below instructions as given. Being a blogger if you aren't using Analytics then you are missing something which is valuable. So today we will learn how we can add Google Analytics to our blogger blog.
Signing Up for Google Analytics :
Step 1. First of all, visit the Google Analytics sign up page and log in to your Google account.Step 2. After signing-in to your Google Account you will be seen a page like the below image, simply click on Sign Up.
Step 3. Now in this step, you have to enter your personal details like Website name, Website URL, Time zone and so on.
Step 4. Fill the details and when done, hit the "Get Tracking ID" button and proceed to the next step.
Step 5. On pressing the "Get Tracking ID" button, a new window will prompt, Which would consist of Google Analytics terms of service agreement. Carefully read it and press the "I Agree" button, and move to the next step.
Step 6. After agreeing to the agreement, the page will redirect you to a new page that would help in tracking your website.
On the top, there will be a "Tracking ID" and on the bottom, there would be a "Tracking JavaScript Code". Copy the Tracking ID which looks like UA-xxxxx-Y and head on to the next steps mentioned below.
Adding Google Analytics to Blogger (Blogspot)
Step 1. Now go to Blogger.com >> Your Blog >>Settings >> Other >> Google Analytics >> and paste your "Tracking ID" in the text area as shown in the image below >> Now Click on Save Settings.You'are all done!
I hope you successfully added Google Analytics to your blogger blog. Now you're all set to keep an eye on each and every visitor of your blog. If you liked this article then do share this with your friends and if you have any queries or doubts then drop a comment in the comments section below, I will get back you with the new article very soon till then stay tuned.
Tags: how to add google analytics to blogger,google analytics,blogger,how to setup google analytics,how to use google analytics,google analytics tutorial,how to set up google analytics on blogger,how to setup google analytics account,how to use google analytics with blogger,add google analytics to blogger,google analytics (software),how to set up google analytics,how to


very nice post bro
ReplyDeleteThanks
DeletePost a Comment